CSS Introduction
- CSS stands for Cascading Style Sheets
- CSS describes how HTML elements are to be displayed on screen, paper, or in other media
- CSS saves a lot of work. It can control the layout of multiple web pages all at once
- External stylesheets are stored in CSS files
- CSS is used to define styles for your web pages, including the design, layout and variations in display for different devices and screen sizes.
-
EX:
    h1 {
      color: white;
      text-align: center;
    }
CSS Syntax

- The selector points to the HTML element you want to style.
- The declaration block contains one or more declarations separated by semicolons.
- Each declaration includes a CSS property name and a value, separated by a colon.
- Multiple CSS declarations are separated with semicolons, and declaration blocks are surrounded by curly braces.
The CSS Selectors
The element selector selects HTML elements based on the element name.
-
The CSS element Selector
The element selector selects HTML elements based on the element name.
p { text-align: center; color: red; } -
The CSS id Selector
To select an element with a specific id, write a hash (#) character, followed by the id of the element.
#id { text-align: center; color: red; } -
The CSS class Selector
To select elements with a specific class, write a period (.) character, followed by the class name.
.class { text-align: center; color: red; } -
The CSS Universal Selector
The universal selector (*) selects all HTML elements on the page.
* { text-align: center; color: red; } -
The CSS Grouping Selector
The grouping selector selects all the HTML elements with the same style definitions.
    h1, h2, p {
      text-align: center;
      color: red;
    }
CSS Comments
- Comments are used to explain the code, and may help when you edit the source code at a later date.
- CSS comments are not displayed in the browser, but they can help document your source code.
-
EX:
/* This is a single-line comment */ p { color: red; /* Set text color to red */ } -
Comments can also span multiple lines:
    /* This is
    a multi-line
    comment */
    p {
      color: red;  /* Set text color to red */
    }
CSS Colors
Colors are specified using predefined color names, or RGB, HEX, HSL, RGBA, HSLA values.
-
EX:
h1 { color: white; background-color: rgba(255, 99, 71, 0.5); border:2px solid #ff0; } -
CSS Color Values
In CSS, colors can also be specified using RGB values, HEX values, HSL values, RGBA values, and HSLA values:
EX:
<h1 style="background-color:rgb(255, 99, 71);">...</h1> <h1 style="background-color:#ff6347;">...</h1> <h1 style="background-color:hsl(9, 100%, 64%);">...</h1> <h1 style="background-color:rgba(255, 99, 71, 0.5);">...</h1> <h1 style="background-color:hsla(9, 100%, 64%, 0.5);">...</h1>
CSS Opacity
- The opacity property specifies the opacity/transparency of an element.
The opacity property can take a value from 0.0 - 1.0. The lower value, the more transparent. -
EX:
img { opacity: 0.5; } - When using the opacity property to add transparency to the background of an element, all of its child elements inherit the same transparency.
-
If you do not want to apply opacity to child elements, like in our example above, use RGBA color values.
  div {
    background: rgba(76, 175, 80, 0.3) /* Green background with 30% opacity */
  }
CSS Gradients
- CSS gradients let you display smooth transitions between two or more specified colors.
-
CSS defines two types of gradients
- Linear Gradients (goes down/up/left/right/diagonally)
- Radial Gradients (defined by their center)
-
CSS Linear Gradients
To create a linear gradient you must define at least two color stops. Color stops are the colors you want to render smooth transitions among. You can also set a starting point and a direction (or an angle) along with the gradient effect.
Syntax :background-image: linear-gradient(direction, color-stop1, color-stop2, ...);Ex1 :#grad { background-image: linear-gradient(to right, red , yellow); }Ex2 :#grad { background-image: linear-gradient(180deg, red, yellow); }Ex3 :#grad { background-image: linear-gradient(to right, red,orange,yellow,green,blue,indigo,violet); }Ex4 :#grad { background-image: linear-gradient(to right, rgba(255,0,0,0), rgba(255,0,0,1)); }Ex5 Using repeating-linear-gradient() :#grad { background-image: repeating-linear-gradient(red, yellow 10%, green 20%); }
CSS Backgrounds
All CSS Background Properties
| Property | Description |
|---|---|
| background | Sets all the background properties in one declaration |
| background-attachment | Sets whether a background image is fixed or scrolls with the rest of the page |
| background-clip | Specifies the painting area of the background |
| background-color | Sets the background color of an element |
| background-image | Sets the background image for an element |
| background-origin | Specifies where the background image(s) is/are positioned |
| background-position | Sets the starting position of a background image |
| background-repeat | Sets how a background image will be repeated |
| background-size | Specifies the size of the background image(s) |
-
CSS background-color
- The background-color property specifies the background color of an element.
-
EX:
body { background-color: lightblue; } -
Transparency using RGBA:
An RGBA color value is specified with: rgba(red, green, blue, alpha). The alpha parameter is a number between 0.0 (fully transparent) and 1.0 (fully opaque).
    div {
      background: rgba(0, 128, 0, 0.3) /* Green background with 30% opacity */
    }
-
CSS background-image
- The background-image property specifies an image to use as the background of an element. By default, the image is repeated so it covers the entire element.
-
EX:
    p {
      background-image: url("paper.png");
    }
-
CSS background-repeat
- By default, the background-image property repeats an image both horizontally and vertically.
-
To repeat an image vertically, set background-repeat: repeat-y;
To repeat an image horizontally , set background-repeat: repeat-x;
Showing the background image only once is also specified by the background-repeat property.
-
EX:
    body {
      background-image: url("gradient_bg.png");
      background-repeat: repeat-x;
    }
-
CSS background-position
- The background-position property is used to specify the position of the background image.
-
EX:
    body {
      background-image: url("img_tree.png");
      background-repeat: no-repeat;
      background-position: right top;
    }
-
CSS background-attachment
- The background-attachment property specifies whether the background image should scroll or be fixed (will not scroll with the rest of the page).
-
EX1:
body { background-image: url("img_tree.png"); background-repeat: no-repeat; background-position: right top; background-attachment: scroll; } -
EX2:
    body {
      background-image: url("img_tree.png");
      background-repeat: no-repeat;
      background-position: right top;
      background-attachment: fixed;
    }
-
CSS background-attachment
To shorten the code, it is also possible to specify all the background properties in one single property. This is called a shorthand property.
Instead of writing:
  body {
    background-color: #ffffff;
    background-image: url("img_tree.png");
    background-repeat: no-repeat;
    background-position: right top;
  }
  body {
    background: #ffffff url("img_tree.png") no-repeat right top;
  }
CSS Borders
- The CSS border properties allow you to specify the style, width, and color of an element's border.
- The border-style property specifies what kind of border to display.
-
The following values are allowed:
dotted- Defines a dotted borderdashed- Defines a dashed bordersolid- Defines a solid borderdouble- Defines a double bordergroove- Defines a 3D grooved border. The effect depends on the border-color valueridge- Defines a 3D ridged border. The effect depends on the border-color valueinset- Defines a 3D inset border. The effect depends on the border-color valueoutset- Defines a 3D outset border. The effect depends on the border-color valuenone- Defines no borderhidden- Defines a hidden border
-
EX:
p.dotted { border-style: dotted; } p.mix { border-style: dotted dashed solid double; } - To shorten the code, it is also possible to specify all the individual border properties in one property.
-
The border property is a shorthand property for the following individual border properties:
border-widthborder-style(required)border-color
-
EX1:
#example1 { border: 5px solid red; }#example1 { border-left: 6px solid red; background-color: lightgrey; }
| Property | Description | Example |
| CSS Border Width |
The border-width property specifies the width of the four borders. The border-width property can have from one to four values (for the top border, right border, bottom border, and the left border). |
|
| CSS Border Color |
The border-color property is used to set the color of the four borders. The border-color property can have from one to four values (for the top border, right border, bottom border, and the left border). |
|
| CSS Rounded Borders |
The border-radius property is used to add rounded borders to an element. The border-radius property can have from one to four values. Ex : border-radius: 15px 50px 30px 5px; (first value applies to top-left corner, second value applies to top-right corner, third value applies to bottom-right corner, and fourth value applies to bottom-left corner). |
|
| CSS Border Images |
The CSS border-image property allows you to specify an image to be used instead of the normal border around an element. |
|
CSS Shorthand Border Property
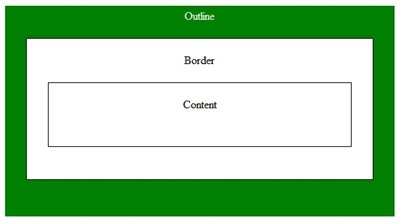
CSS Outline
- An outline is a line drawn outside the element's border.
-
Outline differs from borders! Unlike border, the outline is drawn outside the element's border, and may overlap other content. Also, the outline is NOT a part of the element's dimensions; the element's total width and height is not affected by the width of the outline.
-
EX:
    #example1 {
      outline-style: dotted;
    }
CSS Text
- CSS has a lot of properties for formatting text.
-
Text Color
-
The color property is used to set the color of the text.
EX:h1 { background-color: lightgrey; color: blue; }
-
The color property is used to set the color of the text.
-
Text Alignment
-
The text-align property is used to set the horizontal alignment of a text.
A text can be left or right aligned, centered, or justified.
EX:h1 { background-color: lightgrey; color: blue; text-align: center; }Note : When the text-align property is set to "justify", each line is stretched so that every line has equal width, and the left and right margins are straight (like in magazines and newspapers).
-
The text-align property is used to set the horizontal alignment of a text.
-
Text Direction
-
The direction properties can be used to change the text direction of an element.
EX:h1 { background-color: lightgrey; color: blue; text-align: center; direction: rtl; }
-
The direction properties can be used to change the text direction of an element.
-
Text Decoration
-
The text-decoration property is used to set or remove decorations from text.
it has four values (overline, line-through, underline, none).
EX:h1 { background-color: lightgrey; color: blue; text-align: center; direction: rtl; text-decoration: line-through; }Note : The value text-decoration: none; is often used to remove underlines from links.
-
The text-decoration property is used to set or remove decorations from text.
-
Text Transformation
-
The text-transform property is used to specify uppercase and lowercase letters in a text.
it has three values (uppercase, lowercase, capitalize).
EX:h1 { background-color: lightgrey; color: blue; text-align: center; direction: rtl; text-decoration: line-through; text-transform: capitalize; }
-
The text-transform property is used to specify uppercase and lowercase letters in a text.
-
Text Indentation
-
The text-indent property is used to specify the indentation of the first line of a text.
EX:p { text-indent: 50px; }
-
The text-indent property is used to specify the indentation of the first line of a text.
-
Letter Spacing
-
The letter-spacing property is used to specify the space between the characters in a text.
EX:p { text-indent: 50px; letter-spacing: 3px; }
-
The letter-spacing property is used to specify the space between the characters in a text.
-
Line Height
-
The line-height property is used to specify the space between lines.
EX:p { text-indent: 50px; letter-spacing: 3px; line-height: 0.8; }
-
The line-height property is used to specify the space between lines.
-
Text Shadow
-
The text-shadow property adds shadow to text.
EX:p { text-shadow: 2px 2px 5px red; } - In its simplest use, you only specify the horizontal shadow (2px), the vertical shadow (2px), a blur effect (5px), and color is red.
-
The text-shadow property adds shadow to text.
CSS Fonts
- Using a font that is easy to read is important. The font adds value to your text. It is also important to choose the correct color and text size for the font.
-
CSS font-family
-
In CSS, we use the font-family property to specify the font of a text.
EX:p { font-family: "Lucida Console", "Courier New", monospace; }
Note: If the font name is more than one word, it must be in quotation marks, like: "Times New Roman".
-
In CSS, we use the font-family property to specify the font of a text.
-
CSS Font Style
-
The font-style property is mostly used to specify italic text.
EX:p { font-family: "Lucida Console", "Courier New", monospace; font-style: italic; } -
This property has three values:
- normal - The text is shown normally
- italic - The text is shown in italics
- oblique - The text is "leaning" (oblique is very similar to italic, but less supported)
-
The font-style property is mostly used to specify italic text.
-
CSS Font Weight
-
The font-weight property specifies the weight of a font.
EX:p { font-family: "Lucida Console", "Courier New", monospace; font-weight: bold; }
-
The font-weight property specifies the weight of a font.
-
CSS Font Size
-
The font-size property sets the size of the text.
EX:p { font-family: "Lucida Console", "Courier New", monospace; font-style: italic; font-size: 40px; } - If you do not specify a font size, the default size for normal text, like paragraphs, is 16px (16px=1em).
-
The font-size property sets the size of the text.
-
CSS Google Fonts
-
Just add a special style sheet link in the
<head>section and then refer to the font in the CSS.
EX:<head> <link rel="stylesheet" href="https://fonts.googleapis.com/css?family=Sofia"> <style> body { font-family: "Sofia", sans-serif; } </style> </head>
-
Just add a special style sheet link in the
-
CSS Font Property
-
- To shorten the code, it is also possible to specify all the individual font properties in one property.
-
The font property is a shorthand property for:
font-stylefont-variantfont-weightfont-size/line-height(required)font-family(required)
  p {
    font: italic small-caps bold 12px/30px Georgia, serif;
  }
-
CSS Margins
- Margins are used to create space around elements, outside of any defined borders.
-
CSS has properties for specifying the margin for each side of an element:
margin-topmargin-rightmargin-bottommargin-left
-
All the margin properties can have the following values :
- auto - the browser calculates the margin
- length - specifies a margin in px, pt, cm, etc.
- % - specifies a margin in % of the width of the containing element
- inherit - specifies that the margin should be inherited from the parent element
-
EX:
h1 { margin-top: 100px; margin-bottom: auto; margin-right: 150px; margin-left: 80px; } -
The margin property is a shorthand property for all individual margin properties:
h1 { margin: 25px 50px 75px 100px; } - You can set the margin property to auto to horizontally center the element within its container.
The element will then take up the specified width, and the remaining space will be split equally between the left and right margins.
CSS Padding
- Padding is used to create space around an element's content, inside of any defined borders.
-
CSS has properties for specifying the padding for each side of an element:
padding-toppadding-rightpadding-bottompadding-left
-
All the padding properties can have the following values:
- length - specifies a padding in px, pt, cm, etc.
- % - specifies a padding in % of the width of the containing element
- inherit - specifies that the padding should be inherited from the parent element
-
EX:
h1 { padding-top: 50px; padding-right: 30px; padding-bottom: 50px; padding-left: 80px; } -
The padding property is a shorthand property for all individual padding properties:
      h1 {
        padding: 25px 50px 75px 100px;
      }
CSS Height and Width
All CSS Dimension Properties
| Property | Description |
|---|---|
| height | Sets the height of an element |
| max-height | Sets the maximum height of an element |
| max-width | Sets the maximum width of an element |
| min-height | Sets the minimum height of an element |
| min-width | Sets the minimum width of an element |
| width | Sets the width of an element |
- The CSS height and width properties are used to set the height and width of an element.
- The CSS max-width property is used to set the maximum width of an element.
-
The height and width properties may have the following values:
auto- This is default. The browser calculates the height and widthlength- Defines the height/width in px, cm etc.%- Defines the height/width in percent of the containing blockinitial- Sets the height/width to its default valueinherit- The height/width will be inherited from its parent value
-
EX:
    div {
      height: 200px;
      width: 50%;
      background-color: powderblue;
    }
CSS Units
- CSS has several different units for expressing a length.
- Many CSS properties take "length" values, such as width, margin, padding, font-size, etc.
-
EX:
#p { font-size: 25px; line-height: 50px; } - There are two types of length units: absolute and relative.
-
Absolute Lengths
- The absolute length units are fixed and a length expressed in any of these will appear as exactly that size.
- Absolute length units are not recommended for use on screen, because screen sizes vary so much. However, they can be used if the output medium is known, such as for print layout.
Unit Description cm centimeters mm millimeters in inches (1in = 96px = 2.54cm) px pixels (1px = 1/96th of 1in) pt points (1pt = 1/72 of 1in) pc picas (1pc = 12 pt) -
Relative Lengths
- Relative length units specify a length relative to another length property. Relative length units scales better between different rendering mediums.
Unit Description em Relative to the font-size of the element (2em means 2 times the size of the current font) ex Relative to the x-height of the current font (rarely used) ch Relative to width of the "0" (zero) rem Relative to font-size of the root element vw Relative to 1% of the width of the viewport* vh Relative to 1% of the height of the viewport* vmin Relative to 1% of viewport's* smaller dimension vmax Relative to 1% of viewport's* larger dimension % Relative to the parent element
CSS Lists
-
In HTML, there are two main types of lists:
- unordered lists (ul) - the list items are marked with bullets
- ordered lists (ol) - the list items are marked with numbers or letters
-
The CSS list properties allow you to:
- Set different list item markers for ordered lists
- Set different list item markers for unordered lists
- Set an image as the list item marker
- Add background colors to lists and list items
-
Different List Item Markers
The list-style-type property specifies the type of list item marker.
Examples:ul.a { list-style-type: circle; } ul.b { list-style-type: square; } ol.c { list-style-type: upper-roman; } ol.d { list-style-type: lower-alpha; } ul { /*The list-style-image property specifies an image as the list item marker*/ list-style-image: url('sqpurple.gif'); } ul { /* Remove Default Settings */ list-style-type: none; margin: 0; padding: 0; } -
Position The List Item Markers
- The list-style-position property specifies the position of the list-item markers (bullet points).
list-style-position: outside;means that the bullet points will be outside the list item. The start of each line of a list item will be aligned vertically.list-style-position: inside;means that the bullet points will be inside the list item. As it is part of the list item, it will be part of the text and push the text at the start.
-
List - Shorthand property
- The list-style property is a shorthand property. It is used to set all the list properties in one declaration.
-
When using the shorthand property, the order of the property values are:
list-style-type(if a list-style-image is specified, the value of this property will be displayed if the image for some reason cannot be displayed)list-style-position(specifies whether the list-item markers should appear inside or outside the content flow)list-style-image(specifies an image as the list item marker)
-
EX:
    ul {
      list-style: square inside url("sqpurple.gif");
    }